Friday, October 12, 2012

Bharva Mirchi- Stuffed Green Chilli Peppers with Besan or Chick Pea Flour

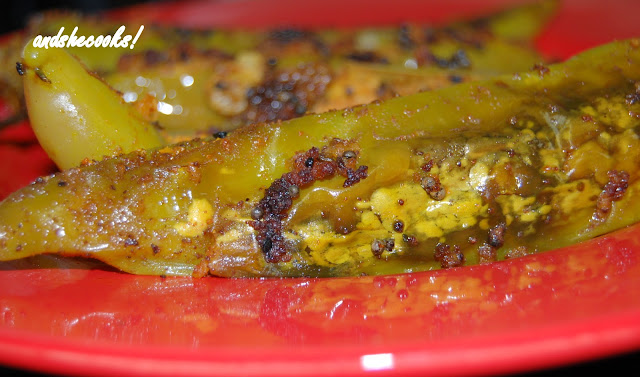
I am leaving for India in just about two hours, but then my friend Anshie of spriceroots , asked me to participate in an online blogger food event and I could not say no to her. I was wanting to post a recipe before I left for India and this provided an excellent chance. I have so many pictures on my hard drive, but no time to sort them out and do a post. So when she asked me to join in the event, I agreed. The event is called 'Know your flours' with a focus on Chick Peas. Indian cuisine has an extensive use of chickpeas flour, all sorts of vegetable fritters fried dipped in chickpea batter, being one. I had some fresh green chilli peppers lying with me. I decided to do a stuffed version which is popular in my state. Something like a fresh pickle if you will. I made only four of them but you can make as many as you like. Serve them warm with a main of rice-dal or for morning brekkie of paranthas and yoghurt. Finger licking good and really easy to not only assemble but to cook as well.

Ingredients:

4 fresh, green chilli peppers, long ones, washed, dried, slit in the middle and deseeded. Jalapenos will be fine.
1 cup of chickpea flour
1/2 tsp of fennel seeds
1/2 tsp
1/2 tsp turmeric
1 tsp red chilli powder
1tsp of amchur (mango) powder
1/2 tsp of ajwain seeds (carraway)
Juice of 1 lime
2 tbsp each of very finely chopped onions and fresh corriander leaves
1 tbsp of raw mustard oil


Combine all of the above in a plate except for the chillies. Now stuff the slit green chillies with this mixture and keep aside. Do a taste test, sometimes a little extra salt, than you would normally use, is required.

For the Tempering:

1 tsp of mustard seeds
2 tbsp of mustard oil
a few pods of fresh garlic


How to:

In a wok heat 2 tbsp of mustard oil untill smoking. Chuck in mustard seeds and let splutter. Throw in garlic pods. Place the stuffed chillies in to this wok, brown on all sides for approx two to four minutes on  medium flame. Wait to get brown specks on the chillies. Lower the flame to low, cover the wok with a dinner/flat lid or plate. Now put 1 cup of water over this plate, so that the steaming action will soften and cook the chillies underneath. Chickpeas take 'longish' to cook, so cooking these stuffed  a good fiteen to twenty minutes on low flame, covered will do the trick. Thats it! Done! This will stay in the fridge up to a week if you dont use onions, else 2-3 days. Store in an air tight container. You may adjust the tanginess, heat and salt factor according to your taste. If you have extra stuffing left, use it to make stuffed paranthas or simply just sprinkle it all over the chillies before you cover them. They make a moist, tasty crust on top and sides of the chillies.


Linking to Anshie's  Know Your Flours: Besan Chickpea Flour blog event. Do hop over to check out other entries and to participate even!
 

Saturday, October 6, 2012

Things have been a little quiet here...

I am sorry about the long absence. While  many good things have been cooked and photographed, I have not had time to blog about them. It happens often to me, I start off with a big bang and then kind of fizzle out. I am hoping that wont happen this time. I love to cook and entertain. However, for the next six weeks, I will be away in India, visiting my parents. Whenever I go home, I make a resolution to stay away from phones and the laptop. Which means no facebook, no emails, no sms's and no phone calls. It is my detox time and I enjoy being away from it all. I do this twice a year. It has always worked wonders and I come back to Dubai all rejuvenated. We all need it. Time spent at the parents' is completely me time and I also dont do any cooking at all. On the other hand, I get to enjoy all the amazing home food cooked by my mother's cook. She is fabulous....I hope to share some pictures with you. In the mean time, here is a lovely shot of a little viginette I created this evening at home. For your viewing pleasure and to tell you to not to abandon me while I am gone, my 2.5 readers!


Will try and post one or two recipes here before I leave. Toodles!

Monday, September 10, 2012

Hariyali Murghi- Grilled Chicken in a Green Masala Marinade

Apologies for being absent so long. In the last one month life has become a total roller coaster leaving me no time to breathe, leave alone blog! I went back to work after a loooooong hiatus. Four years to be precise. To teaching. In the same play school as my son. It has taken all of us a month to settle down to some order and routine even though cooking has been happening on a regular basis ofcourse. I mean the 'good food' kinds. I managed to tkae pictures and download them too. But thats just about it! My head keeps buzzing with so many posts and pictures and recipes to be shared with you all which never see the light of the day! I do post somewhat more frequently on my facebook page so if you want to remain connected to the fabulous me, please go and check it out and while you are there, click on the 'like' button too. Yes, I do 'like' collecting 'likes'. Thank you.

Now on to my recipe for this post. Easy and quick but requiring a decent (read as long as possible) marination time. I had some frozen chicken in the freezer, about half a kilo and knew it would not be enough to be made in to a curry or even pulao/biryani for three adults in the house currently. Hubster's childhood friend is shifiting base from Abu Dhabi to Dubai, and untill he can move in to his new flat, he will stay with us. So there, we are three of us. Anyhow, I decided to make an easy vegetable curry with rice and this chicken as a side. Plus ofcourse, no meal in my house is ever complete without a big 'desi' salad. :) The marinade is super easy to make and any extras can be used as a chutney/dip/spread or frozen for use later.

Here's how.

1/2 kilo of chicken, medium sized pieces, washed and drained.

For the marinade:

1/2 cup of fresh mint leaves
1 cup of fresh corriander/cilantro leaves
1tbsp of roasted and coarsely ground coriander seeds
1tsp of roasted and crushed ground cumin seeds
1 tsp of heaped chaat masala (avlbl in all Indian/asian stores)
1tsp of turmeric powder (optional)
1tsp of freshly cacked black pepper (optional)
1 tbsp of sour cream or fresh thick plain yoghurt (optional)
Juice of one large lemon or 2 tbsp white vinegar
1'knob of fresh ginger
5-6 cloves of fat garlic pods
4-5 fresh green chillis (adjust according to pref)
3-4 tbsp of mustard oil (or butter or Desi Ghee)


Take all the ingedients meant for the marinade and make a paste in your blender. Marinate your chicken in this paste and forget about it for at least 4 hours if not more. I marinated mine for about 6 hours. Just 30 minutes or even 15 minutes before you start to grill/pan fry/barbeque the chicken, take out of the fridge and drizzle some mustard oil over the pieces. Using mustard oil gives it a nice kick. One can use butter or even pure Desi Ghee (clarified butter). Say about 4 tbsp, if using mustard oil. Use a little less, if using oil/fat other than mustard oil.


This is how my marinade looked. Nice huh? Love the colours. Do shake off the extra marinade before girlling.
 
Once the chicken has been well marinated, line them up in a greased and foiled tray.
 
 
I also spread some finely sliced onions over the chicken before putting it in for the grilling. Grilling times depend upon your stove. I grilled mine for about 30 minutes, medium flame, 15 min one both sides. Adjust your cooking time accordingly. My contraption isnt the best!


And here it is!


And some of my lovely salad....
 
 
Do try this recipe today!
 
Note: vegetarians, you may substitute chicken with big chunks of Paneer squares, but do remember to not skip on the sour cream then, it will keep the paneer moist and prevent it from becoming rubbery after grilling. Also, paneer wont require a very long marination time, 2 hours should be enough.

Tuesday, July 31, 2012

My Star Pork Ribs in a fiery, chilli-garlic sauce!

I have been dying to share this recipe with you all out there. It is that good, trust me on this one. Years ago, I tasted some buffalo wings brought to work by a Vietnamese colleague. The wings were to die for and I begged him for the recipe. He said it was all in the marinade. Ok, so give me the marinade recipe, I asked him. He was not too willing and was vague. I dont get it. Good food and good books are meant to be shared. Some people might want to add 'good music' to that list too. Anyhow, I have come across enough people who are unwilling to share their recipes/food tips. I think such people are plain mean.

Now, on to the recipe I want to share today. So, I was saying, this colleague did not give me much and for quite some time I was left trying to replicate that same taste. Over last week, I am super-duper pleased to inform you that I not only got the same taste as his buffalo wings marinade, but mine was better and how! Come now, let us not waste anymore time bitching about 'vague' colleagues and get down to producing some serious flavours...

Here's what you need to do first off,  prepare your marinade. This is how.
  • 10-15     small Thai red chillis
  • 10          cloves of garlic- chargrilled or boiled- skin included
  • 2            large tomatoes- chargrilled or boiled, skin removed
  • 2            tbsp of soy sauce or any fish sauce
  • 2            tbsp of any rice vinegar
  • 2            tbsp heaped sugar
  • 2            tbsp of oil, I used sesame oil, salt to taste.

How To:

Chargrill Tomatoes, chillis and the garlic pods untill only slightly charred. Cool and clean the tomato skin if grilling. Else, if you are boiling the three, boil them  together untill the tomatoes are softened. Remove skin. Now, cool and blend everything together, except the oil, in to a coarse or fine paste, depending upon your preferance. Keep the skin of the garlic on, it gives a lovely texture.

*Take a tbsp of extra sugar if you like your marinade on the sweeter side, can substitute with honey too, in which case you will have to take more as compared to sugar. I'd say another 2 tbsp more. If you want a tangier kick, take extra vinegar. As usual, do a taste test and decide.

*I recommend using thai red chillis not only because it is fiery hot but also for the lovely red colour it imparts. However, if you cant find these, use any red chillis-fresh or dry, and adjust according to your preferance.


Heat the sesame oil in pan and pour this sauce in. Cook on medium flame untill the oil floats on top. That's it.

*This paste is rather hot and I have used it also as a dip/chutney and a  marinade. Works both ways.

Edited to add: The measurements in the ingredients will yield about 1.5 cups of paste. I used only 6 ribs and used just half cup in the ribs. The entire amount will be good for at least a kilo of any meat easily or even more. Use as per your requirement and store the rest in the refrigerator for use later. Will stay upto a week easily.

Marinate the prok ribs in this marinade for as long as you can. I did not have much time on hand, so made do with only 2 hours. It was all good anyway. Grill on medium heat for about 10-15 minutes on each side. If you marinate the meat longer, you might need to grill less. Adjust according to your grill settings.

 In the mean time prepare your sides. I usually serve pork ribs with chunky bites of grilled veggies and mash potatoes and sometime not even that. Just a big, garden salad is good for us. This time I did make an effort and served up some veggies with Halloumi cheese- all seasoned simply with salt, pepper, dried herbs, whole pods of garlic and a generous drizzle of extra virgin oilve oil. I also made some garlic dinner rolls, mashed potatoes and a salad. I was in a good mood obviously!


And the veggies....


Slices of zuchini, jalapeno, bell peppers, red onions, garlic and halloumi cheese...I love grilled Halloumi.


That cutlery belonged to my grandparents, from the 1950's, Sheffield, England. Now, they belong to me and shall be passed on to my grandchildren one day! :)


 Weeknight inspiration folks! Hubster loved it.
PS- Use this marinade for chicken wings, shredded lamb or duck, boneless beef kebabs or simply cottage cheese. Or use as a dip/sauce with fries and nachos.  100% heaven assured.

Monday, July 23, 2012

My Favourite and The Very Desi- Shaami Kebabs

My maternal grandmother was an awesome cook and although she is no more with us, her strongest legacy perhaps, are her desi recipes. They have been passed down to almost every family member and we have all taken great pains to continue cooking certain dishes just the way she taught. My own mother does not cook at all but she has ensured that Nani's traditional recipes carry on being cooked and served by our family cook. My mother's cook had the good fortune to have met my Nani and managed to learn much from her. Thankfuly, she does a great job! Some of our family favourites include Yakhni Gosht Pulao (Pulao cooked on slow heat in a meat stock and yoghurt), Bhuni Kaleji (Fried liver), Mata Keena (Mince with peas), and ofcourse Shaami kebabs.

Shaami kebabs remain an absolute favourite of every member in our family and even amongst friends who have been visiting us for years. Mom gets this made especialy for her X'mas parties, kilos and kilos of it. We have been told by our friends that they wait the whole year especially to get invites for X'mas and eat shaami kebabs to their heart's content! Not that they need to wait for Xmas per se! When I visit Benaras for my holidays, mom makes sure there is plenty of Kebab mixture kept in the fridge so that my entire holidays are spent in utter bliss-think kebab parathas for breakfast, Dal-chawal and kebab for lunch, Kebab and buns for tea and so on....

It is easy enough to prepare. Once you have the mix ready, you can alsomake patties and keep a batch in the freezer for use later. They can be simply taken out and shallow fried straight away. No need to even thaw!

Here's the How To:

500 gms Calf/Mutton mince
1/2 cup of (medium sized) Soaked chana dal-10 mins
1' stick of cinammom
4 green cardamoms
1 big black cardamom
4-5 cloves
10-15 black pepper corns (depending on your taste)
5-6 whole red dry chillis
1 tsp cumin seeds
1 tsp Saunf- fennel seeds (this is my addition and not a part of Nani's recipe)
1tbsp ginger-garlic paste

Boil the above in 1 cup of water in a pressure cooker. Untill completely done. About 5-6 whistles on medium flame.


When the mince is bolied along with the spices, open pan, take out the mixture, let cool on a plate. Also, fish out the cinammon, big cardamom, cloves(if you can) and chuck them away.


Once the above is cooled, grind them in your mixer to a paste. Ensure that it does not become too thin a paste. Coarse is fine. The picture above is of the bolied and cooled mince with the spices.

To this now add :

1 medium sized onion, very finely chopped.
A handful of mint leaves, finely chopped
A handful of fresh corriander leaves, finely chopped
4-6 fresh green chillis ( or as many as you prefer) finely chopped. I make it rather hot.
*2 eggs beaten or *1 tbsp of hung yoghurt or *2 slices of stale white bread. Either one is fine although using hung yoghurt gives it a nice flavour and a hint of tanginess.


* Add salt to taste (and onion too), at the very end, just before frying the kebabs so that you dont get a wet, soppy mix due to the moisture content in the salt and onions.
* Instead of fresh onions, you can also use fried/caramelised onions.

Mix and make patties. Shallow fry in very little oil. Say about 2 tbsp. If you use too much oil, the kebabs will surely crumble, like it happened to my kebabs in the picture below...I used more than 2 tbsp because I was distracted. In my next batch, I used only 2 tbsp and they were perfect!  Fry them untill browned on both sides.


 Serve warm with mint chutney/dip and some onion rings. As a starter or even as a side to your main course.

Saturday, July 21, 2012

This one comes easy to me- Butter Chicken!

Butter Chicken is probably one of the most famous dish of India preceeded only by the Tikka. If you are visiting an Indian restaurant for the first time and are new to Indian food, you may order Butter Chicken with a fair amount of confidence and be assured that your introduction to Indian food wont be a disaster. The flavours are easy on the palette, the colour and texture silky, and the meat itself satisfying. Especialy, if eaten with Naan. There are probably many versions out there, but the lead in cooking a mean butter chicken is taken by the Punjabis. No doubt about that! However, whenever I have eaten it outside or even in homes of friends, the flavours are mostly similar. The reason for this being the use of dried Fenugreek leaves- the ingredient one cannot/must not omit. With that in mind, the rest is easy. If I can make it, so can you and easily enough.

Here's how.

How to:

1 kg of Chicken, or 12 largish pieces
2 tbsp of fresh, plain, thick Yoghurt
2 tbsp of fresh Ginger-Garlic paste
2 tbsp of fresh Lime juice
2 tbsp of any store bought brand of 'Tandoori Masala' - must not omit
Salt to taste.

Wash and drain chicken. Then you go ahead and marinate it in the ingredients given above. Leave for at least 4-5 hours or a minimum of 1 hour. If you have time, keep marinated overnight.

Just before you are going to make the sauce/gravy for this- grill the chicken pieces in your oven in a baking tray lined with foil. About eight minutes on each side or untill till juices run clear, the chicken pieces aquire a proper browned, grilled look and is done. If you don't have a grill, fry the marinated chicken pieces in a wide shallow pan in about an inch of any vegetable oil. Untill done. If you have marinated the chicken for long, it will cook very fast, just ensure you dont burn them though! Keep aside covered.

For the Sauce/Gravy:

4 medium to large Onions- thinly sliced or made in to a paste in your blender.
2 packs of thick Tomato Puree or  about 1.5 cups full- I always but this for my butter chicken because of it's tanginess and thickness and colour.
1 tsp black Cumin seeds, Shajeera.
1 tbsp heaped dried, Fenugreek leaves,crushed in your palms.
1' stick of cinammon
5-6 green Cardamoms -coarsely ground
1 tsp heaped Kashmiri Lal mirch - mainly for it's colour red.
1 tsp regular Red Chilli powder. Take more if you like it hot. Say about another teaspoon.
1 tsp of freshly ground Black Pepper (optional, if you would rather avoid the heat)
1 tbsp of Corriander powder
1/2 tsp of Turmeric powder
A pinch of Nutmeg
4-5 blades of Mace.
1 tbsp Sugar (will explain why this will be needed)
Salt to taste- remember you would ahve already used salt in the marinade before too.
50-100 gmas of any salted Butter, regular kinds will do.

2 tbsp of fresh Cream, a handful of fresh Corrainder leaves, a few Green Chillis slit, about a tbsp of fresh Ginger juliienes- all for garnishing.

In a wide bottomed pan heat the butter on a medium flame. When just about getting heated, tip in the dry spices- cumin, cinammon, cardamoms, nutmeg and mace. Do not put the chilli/pepper,corriander or turmeric powders for now. In a few seconds the spices will splutter and turn a fragrant brown. Now add the onion slices/paste. The onions will release a lot of water if using in a paste form. This will also take a longish time to brown. So keep stirring/sauteing on a medium flame. Do this untill all the moisture has evaporated, the paste has become dryish and browned. Like I said, it might take a good 15 minutes to get this done. You can also use sliced onions instead, but in butter chicken, the gravy needs to be smooth,thick- so I recommend using the paste form.


Once the onion paste has been cooked through, oil has surfaced on top, next in goes the tomato puree. A note here- You could use fresh, home made paste too but again- I use the ready made puree for the colour and tanginess.The final curry is not tangy and is infact just slightly on the sweeter side. So do yourself a favour, get those store bought puree packs/cans. Contiune cooking the tomato puree along with the onion mix on medium flame. Cook and stir untill oil floats to the top.


Notice how the gravy starts acquiring a dark, reddish hue.

 While you are cooking this, do a taste test- you will notice that the mixture will taste raw and almost bitter for quite some time. This is because of the puree being used. This is when you first add salt. Taste again. If tangy, put in sugar now. Mix and taste. Use your instinct here. The curry wont be sweet per se but should not taste tangy, raw or well, weird! Also add in the  Corriander powder, turmeric powder, the Kashmiri chilli powder, the regular red chilli powder you are using and the black pepper powder. Mix well. Do a taste test again. If it tastes like the curry has come together well, finally slide in the chicken pieces. Mix. Sprinkle a few corriander leaves, some fresh ginger jullienes, green slit chillis, pour some fresh cream over - cover and cook on low flame for about 15 minutes. This is where we are giving it a simple 'Dum'- for the flavours to combine. Since the chicken was already pre-cooked, we dont have to wait for them to get done. The last 15 minutes are simply to let everything sit together and infuse.


Just before serving, if you want, you can repeat the garnish suggested. Serve warm with Naan bread or a simple pulao.
PS- This one is for you 'Donna'!

Thursday, July 12, 2012

Gosht Korma- Easy, Elegant Lamb Korma

I have done chicken and fish and a vegetable so far, on my blog. Time I posted something on Lamb too! Lamb happens to be my all time favoutie meat and has the power to bring me to my knees anytime, anywhere, whichever way it is prepared. The recipe I am sharing here is easy, elegant and versatile. 'Korma' has many variations but I think this is the most standard technique employed across Northern India and Pakistan. I got it from my neighbour SI, who is from Karachi and is a fabulous cook. She is also generous about sharing her recipes for which I especialy admire her. Serve this with a simple Cumin flavoured Pulao and you will be good. I also usually serve a side of mixed Vegetable Jhalfarezi with this if I have guests because I dont make my Korma very spicy, and the Jhalfarezi serves as just the right tangy accompaniment to this otherwise simple lamb curry. It has a tangy-creamy yoghurt sauce base with very simple flavours. Without further ado, read on for the recipe now.

How to:

Lamb: 1 kg I prefer the shanks and some pieces of ribs, of a baby goat. Washed/drained.

Step 1:

2 large onions- finely sliced and deep fried. Browned/caramelised. Drained on a kitchen paper towel.
1 large cup of thick Yoghurt.
Once the onions have cooled off, blend the Yoghurt and onions together to a fine paste. Keep aside.Reserve about 2 tbsps to garnish later. This is the curry base of all kormas.

Now for the other ingredients:

5-6 Green cardamoms
1 Black, big cardamom
5-6 Cloves
1-2 sticks of medium sized cinammon.
A small pinch of nutmeg (optional)
4-5 blades of Mace (optional)
A few drops of Kewra essence (optional)
1 tbsp heaped Ginger Garlic paste

Step 2: To dry grind:

10-12 Almonds (optional but recommended)
2 tbsp heaped corriander seeds
1 tsp heaped cumin seeds
8-10 dry, whole red chillis.
Grind to a coarse powder and keep aside.

Oil for frying onions- about 1/2 cup
salt to taste.
Some extra 3-5 dry red chillis fried and kept aside for garnishing.

Here's how the Korma will be made:

Heat oil in a  wide 'kadai' - Indian wok. Use the same oil in which you fried the onions. Lends a nice flavour and you save on oil too. :) Once heated through, tip in the cardamoms, cloves, cinammon, nutmeg. Let them splutter for a few short seconds. Now add the ginger-garlic paste and saute on high heat, browning it nicely but taking  care not to burn it. Once the raw smell disappears, put in the meat pieces and continue to saute on high flame. Keep stirring it around and wait untill the moisture released by the lamb dries up. At this point the lamb pieces should have also acquired a nice brown tinge. Once the water dries up, sprinkle the ground spices you made of the Almonds, corriander, cumin and red, dry chillis. Mix well. Cover and cook on low flame for about 5 minutes. If the spices start sticking to the bottom of the pan, put in a quarter cup of hot/warm water. The whole dish should look brown and caramelised. After about 5 minutes, pour in another cup of water , cover and cook untill the meat is almost done.  PS- keep adding 4-5 tbsp of water  from time to time, if the meat is drying up.

Once the meat is almost done, pour in the Yoghurt-Onion paste over the meat. Mix vigrously so that the yoghurt does not curdle. Do this for about five minutes. Cover and cook now, untill the meat is completely cooked. In the final two minutes, add about 3-4 drops of Kewra essence.

Serve garnished with the fried onions you had reserved earlier and some fried whole red chillis. Like I said, I usually serve this with Zeera Pulao and Vegetable Jhalfarezi along with the usual Salad.


The final gravy should be thick and not runny.


Best served after a few hours, but I doubt you will be able to wait so long!!

Tuesday, July 10, 2012

The Bong in Me- Part 1

I love Bengali cuisine. I did not always, because for me, it was an acquired taste. Almost all my neighbours back home are Bengali. I really had no chance to escape their influence growing up, so finally, I succumbed. I will often repeat myself here that I dont much care for fish/sea food. Let me modify my stance- I do like fish cooked the Bengali way! There, I have said it publicly.

Around a year or so ago, I was searching for food blogs with autehntic Bengali recipes, especialy Bhapa Doi- Steamed, sweetened Yoghurt- a Begali dessert and a huge delicacy even amongst us non Bengalis. Trawling through the net, I stumbled upon this lovelyyyyy blog called preeoccupied . I was in love. Loved her posts on  food/cooking and life in general.... She is a Bengali who makes the most mundane meals look exotic! On her blog, I also found almost all of the traditional,authentic Bengali recipes. When facebook happened , I drew major inspiration from her pcitures and the sheer effort she puts in to everything she cooks. She says she cooks because she cares! And it shows! (And I know I started a sentence with And. Twice.It is OK) This blog actually owes it's inspiration to Pree. Do go and visit her and enjoy the visual feast(s). In the mean time I am sharing a simple steamed Pomfret recipe, taken and adapted from here. 

The recipe requires Ilish or Hilsa, however, I was impatient to recreate my childhood memories of eating fish steamed in mustard sauce at my Bengali friends' homes. I was also more anxious about getting the marinade right the first time rather than fuss about the kind of fish, and anyway, what will I know about the 'right' fish!! So I made it with fresh white Pomfret. Again the original recipe requires use of Banana leaves to make little parcels for the marinated fish pieces, mine were over, so modified with the use of kitchen foil. I am sure the banana leaves gives it a unique flavour and can probably not be substituted, but anyhow, maybe next time.

How to:

1 medium to large size of : Pomfret
1 tsp of Poppy seeds( optional , since for readers of the Middle East, use of Poppy seeds is banned)
1 tsp of Mustard seeds each-of yellow and fine + the bigger, black ones
4-5 fresh green chillis
1 tsp, levelled turmeric powder
Salt to taste
2-4 tbsp of Mustard oil.

Also need a steaming contraption. I simply used a sauce pan filled 1/4 with water and set on rolling boil with a steel strainer on it. Like below.


In a coffee grinder/mixer, grind all the seeds together, then add about 2 tbsp of water, green chillis, turmeric powder. I also added half of the oil being used. Make a thick paste. Marinate the fish in this for at least 30 minutes to an hour. Drizzle the remaining oil over it . I marinated mine  for almost 4 hours because I was busy and did not have time to cook it before that. Well, that was good because Pomfret has a thick skin, so by the time I did get around to steaming it, it had absorbed the marinade perfectly. Now, wrap the fish lightly in almunium foil and seal all edges. Steam for 20 minutes on medium to high heat. Serve warm with plain steamed rice. Or in my case, with a big bowl of salad greens only. :) Everybody, give it up for my lovely lady Pomfret posing for us.


This was bliss after oh, so many years!!!

Saturday, July 7, 2012

Some of my favourite things....

This weekend I went shopping for some of my absolutely favourite things. Bakeware/stoneware in a  gorgeous red. I have a serious weakness for all things clay and ceramic. Love the beautiful colours and glazes. I plan to slowly but surely build my collection to a full cook and serve dinner set in my favourite colours of Red and Yellow. I was so excited that I hardly slept all night thinking up of all the glorious food served in it and the photo op it will provide me. To see more of what all I bought , go here. I am sure you will all love it! Also, do share pictures of your kitchen 'prettiness' too here in the comments section. It will be so much fun!

Fish Fry-The only kind I seem to know!!

I grew up in a small town called Varanasi in the state of Uttar Pradesh, North India. It is a town sacred to Hindus/Buddhists and eating a lot of non vegetarian food is not the norm. However, many people ofcourse do. The preferred meat of choice is lamb and chicken. Fish is consumed largely by the Bengali folks here and Pork/Beef meat, hardly at all. Like most of the regular families, mine also mostly eats lamb and chicken although my father loves fish/seafood. My mother is allergic to all kinds of fish as a result of which, cooking fish was a rarity in my house. Me and my brother never developed a taste for it and till date we often struggle to get reasonably excited  to eat fish.

All that changed for me when I fell in love with a South Indian boy! My husband is from Kerela and was  brought up in Chennai. He is from a family which is a hardcore fish/seafood  eating one. They sometimes even eat fish curries for breakfast! This is some kind of 'blasphemy' for a staid north Indian like me-food wise that is. Anyhow, I quickly realised after getting married that I will have to buy, clean and cook fish on a very,very regular basis if I was to be peacefuly and happily married. Oh dear! I had never ever bought fish, never cleaned or cooked it before my marriage. This was going to be a genuine test for me. Over the years though, I am happy to report, I have surprisingly grown fond of at least all kinds of shell fish , if not fresh water. I do feel squeamish cleaning it but have now mastered many kinds of curries and dry fish dishes which my husband says is almost 'Malayalee' (Keralite). Most of the curries/fries I know belong to Kerela and I never use Bengali styles of cooking fish because my husband actively dislikes bengali cuisine. I cook fish at least four times a week if not everyday.

The recipe I am going to share today is my all time go-to recipe for a quick and simple fried fish. Requiring minimum marination time, I recommend using Sardines or Mackeral, which is what I have seen being used in Kerela cuisine. I sometimes go a step further in changing up the marinade slightly which also tastes just as nice. Husband of mine is one happy bunny whenever I make this. The traditional way I have seen my mother in law marinating is the use of simply- tumeric powder, red chilli powder and salt to taste. She then shallow fries the marinated fish. Thats is. I however add corrainder powder, black pepper powder and fresh lemon juice too. You can prepare your marinade whichever way you wish to. My mother in law's method is just as good and keeps the flavours more natural and fresh.

How to:

4-5 pieces of small to medium sized whole Sardines/Mackeral, not sliced.
1 tsp heaped red chilli powder or according to preferance
1/2 tsp turmeric powder
2 tsp corriander powder
1/2 tsp freshly ground black pepper powder (optional)
salt to taste
Juice of 1 lemon if large in size or juice of 2 small sized lemons.

To be used when frying the fish:

5-6 tbsp any vegetable or coconut oil (which I personaly dislike)
1 tsp heaped ginger/garlic paste
5-6 curry leaves

Mix the ingredients listed in the first section in a bowl and marinate the fish pieces in it for at least half an hour. As usual, the longer you marinate your meat, the better the taste. But fish being so tender as a meat, does not usually demand a very long marinating time. Anyhow.

Now, this is where I do it slightly differently apart from using corriander powder in the marinade. Some people also apply a small quantity of ginger-garlic paste to the fish. I used to do that too but realised that when I started to fry them, they would quickly burn and taste bitter. So now this is how I fry the marinated fish.

Take about 5-6 tbsp of cooking oil in a frying pan. Once it is heated through, add in 1 tsp of heaped ginger-garlic paste. Brown this paste to a nice golden brown but take care not to burn it. Now place the marinated fish pieces in the pan and shallow fry till crisp, and browned on both sides. Say about 4-5 minutes in each side on a high or medium flame. The use of ginger garlic paste this way gives it a nice crunch and colour. In the last 2 minutes of frying, I also throw in a few curry leaves, about 5-6. Curry leaves used at this stage takes it to a whole new level.

Here are some pictures to guide you along.


The marinated fish above.


Fried with some curry leaves and fresh green chillis.

Serve fresh along with Sambhar and rice or even just as is at the start of the meal with some sliced onions and crisply fried green chillis.

Sunday, July 1, 2012

A Different Take on Okra

I grew up eating Okra prepared the same way, every time, all the time. It soon became painful and my fondness for Okra ended pretty much permanently. In the last few years , I have mostly ignored cooking it. Untill a few days ago, when my friend A also said a firm NO to my offer of cooking Okra for her.That got me thinking. How could I make it more pleasing to the pallette, surely something could be done? I sat and brainstormed and the result was this recipe. Flavoured with a simple spice blend and stir fried in a mushy tomato paste. Finished off with just a dash of lemon juice. If you have a painful association with Okra, I think this recipe will undo all that damage!

How To:

Fresh tender Okra/Bhindi: 1/2 kilo
Tomato: 1 large, chopped fine
Ginger/Garlic paste: 1 tbsp

Corriander seeds: 2 tbsp
Cumin seeds: 1 tsp
Dry, whole red chillis: 4-5 (or less if you want)
Turmeric powder: about 1 tsp, levelled
Salt to taste
Oil for frying : 5 tbsp+3tbsp
Fresh lemon juice: 1-2 tsp

Wash and pat dry the Okra. Cut in to inch long pieces. Smear with a little salt and the turmeric powder. In a 'kadai' (Indian wok) , heat about 5 tbsp of oil. Now add the chopped Okra. Saute for five minutes on high flame. Keep aside.


PS- I forgot to put turmeric in the Okra myself. So anyway, added it while I was frying it. No harm done.


In the same wok, heat the remaining 3tbsp of oil. Once heated through, add ginger/garlic paste and saute. Keep the flame on medium. Brown the paste and once the raw smell of the paste is gone, tip in the tomatoes. At this point increase the flame to high and keep sauteing. After about five minutes, the tomatoes will start to get mushy. We need to get a jam like consistency, you can flatten the tomato mixture with the back of your spatula.


PS- again, I forgot to first brown my ginger/garlic paste. So added it as and when I remembered. Again, no harm done. It all has to get squishy-sqaushy anyway.


 Now add the Okra which you had kept aside. Also sprinkle over this, your spice powder and mix thoroughly. Season with salt. Cover and cook for 8-10 minutes on very low flame. By now the Okra and tomatoes will both be cooked through. You will notice that Okra will also not be slimy-sticky. This is because we had pan fried it lightly in tumeric already! Just before serving warm, drizzle a bit of fresh lemon juice.


Serve with any Indian bread and Dal fry.

Friday, June 29, 2012

My First Post and Signature Chicken Karahi

If you are in the habbit of storing frozen meat (Chicken in my case) in your freezer consider yourself lucky! Here is my first ever post which requires you to take that meat out now, defrost it and make yourself this super easy and quick Chicken Karahi. This recipe is my own from the days when I did not know much about Asian/Indian spices but harboured ambitions of becoming a fabulous cook some day. I was newly married with a husband to impress . I was also new to Dubai and did not have much to do in life. Even though I was always fascinated with cooking growing up, I did not really know much. I remember my mother chasing me away from the kitchen 'begging' me to complete my home work rather than fool around trying to experiment with a curry. Sigh... It was a budding culinary romance nipped in the well, bud. Anyhow, so here I was, with a husband who had faithfuly presented himself at work after the long months of visa-induced seperation from me, expecting a home cooked meal every night. Far from the days of being boyfriend-girlfriend, when we could just go to the nearest restraunt and order away.

This recipe was a brainwave of a clueless mind. I didn't know my spices well, so I decided not to use any. Simply chopped some onions, tomatoes,green chillis, ginger and garlic and cooked everything together to death, garnished with fresh clinatro and served it with some Dal and Rice. Turns out the husband loved it. Score!! Ever since that night, I have made this Karahi often. When I am lazy or in a rush and crave a simple , no fuss meat dish, I depend on this recipe. So can you and here's how.

  1. Fresh or Frozen Chicken:  -           1 kg (you can also just use chicken drumsticks)
  2. Onions:                          -                2 large, sliced finely
  3. Tomatoes:                                       2 large, chopped fine
  4. Giner and Garlic paste:       -          2 tbsp heaped
  5. Fresh Green chillis:             -          5-6 finely chopped.
  6. Fresh Cilantro/Corriander leaves :  about a whole bunch or a cup full, finely chopped
  7. Salt to taste
  8. Any vegetable oil  but not Olive oil. Indian subcontinental cooking does not do well with olive oil. Please do note this.
How To:

Heat about 5-6 tbsp of any vegetable oil in a wide bottomed pan. Start with adding in the ginger garlic paste and wait for it to caramelise/brown. Then add the green chillis. In a few seconds add the sliced onions and now saute it all well till the onions also take on a nice brown/caramelised tinge. See picture.


Once you see the onions have lost their pinkness and oil is starting to seperate, add the chicken pieces. Keeping the heat on high, mix this all well and keep sauteing. The chicken along with the onions also needs to get browned and practically completely cooked. Once the water/juices have almost dried up, you can reduce the heat to medium. Finally, add the chopped tomatoes and give it all a good stir. Continue cooking on medium to high- heat because we need to get all the moisture/water released by the tomatoes dry. Season with salt. From the start to finish, the entire process whould take about thirty minutes.

OR

PS- If you dont have time or the patience to stand by the stove, you can simply add all the ingredients (except tomatoes) in the same order as listed in the above method. Cover with lid and let cook. Then after about 10 minutes on medium-low heat of cooking, check the onion/ginger/garlic/chicken mix - it should loose it's raw smell, will look browned but watery and some oil would have seperated. Now  you can go ahead and add the tomatoes. Once however you have added the tomatoes, you need to crank up the heat in the last 10-12 minutes, so that the entire mix is dried up and takes on a lovely browned colour. Season with salt. This dish is dry-ish in consitency with the 'masala' sticking to the chicken pieces.


Serve garnished with fresh cilantro with Chapatis/Parathas or a Vegetable Pulao. Dont forget a simple fresh salad too!